On-Model Imagery Without a Photoshoot: AI Product Images for Clothing (2026)
On-model imagery sells apparel, but shoots are slow and costly. Here is how AI product images for clothing work, where they fail, and how to keep them accurate.
A shopper cannot try your garment on. The only thing standing in for the fitting room is your imagery. If your product page does not show how the piece sits on a body, the shopper guesses. When shoppers guess, they order two sizes, keep one, and send the other back.
A product page is not a product photo with a paragraph under it. It is a system for answering one question: will this fit me? On-model imagery is how you answer it. And with AI, you can answer it for every style and colorway without booking a studio for each one.
This guide explains what on-model imagery is, how to make it with AI without misrepresenting fit, and how to keep every image product-accurate.
If you only read one thing
- On-model imagery shows a garment worn on a human body so shoppers can judge length, fit, and drape. Baymard research finds it is key for apparel, accessories, and cosmetics.
- Fit is the number one driver of apparel returns. Showing fit clearly on the PDP is the cheapest return reduction you have.
- AI on-model imagery generates the worn shots from your product input, so you can cover every style and colorway, not just the heroes.
- Accuracy is the whole game. An on-model image that misrepresents fit or fabric causes the returns it was meant to prevent.
- Show more than one shot. Front, back, and a detail or movement shot, ideally on more than one body, help more shoppers see themselves in the piece.
What is on-model imagery?
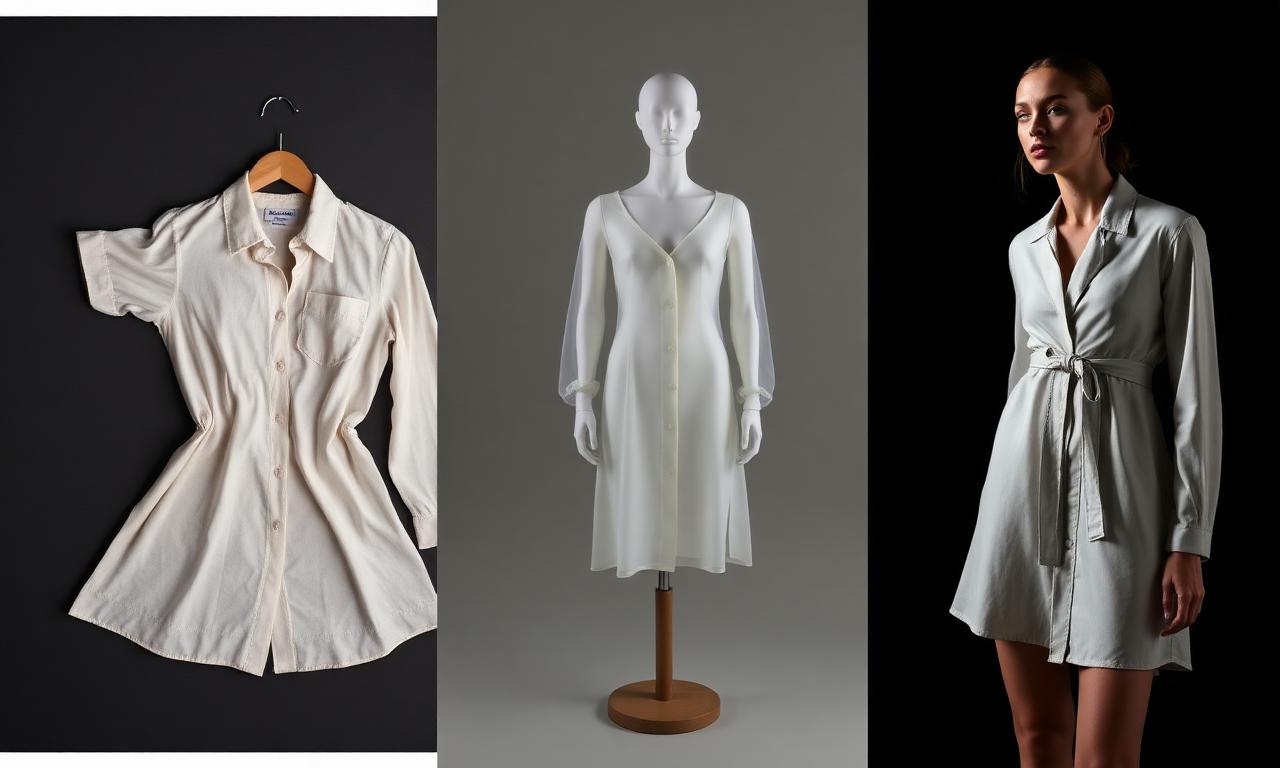
On-model imagery is product photography that shows a garment worn on a human body. It is the opposite of a flat lay or a cut-out shot, where the product sits alone with no figure for reference.
The point is fit. When a shopper tries clothing in a store, they learn its length, tightness, and drape. On-model imagery is the closest an online product page gets to that experience. Baymard Institute found that "human model" images are key for three product types: apparel, accessories, and cosmetics, because they let users judge length, scale, and fit, per Baymard's research on human-model images.
AI on-model imagery is the same output produced with generative tools. Instead of booking a model and a studio for every style, you generate the worn shots from a product input, like a 3D file, a CAD, or a flat product photo. Done well, it shows the same garment on a body, from the angles a shopper needs, at the scale of your whole catalog.
The keyword is "done well." On-model imagery only works if it is accurate. An image that flatters a garment but lies about its fit creates the exact problem it should solve.
Why fit is the thing your PDP has to prove
Fit is not a nice-to-have on a fashion product page. It is the deciding factor, and the cost of getting it wrong shows up in returns.
Returns are large and growing. The National Retail Federation and Happy Returns estimated total US retail returns at $890 billion in 2024, about 16.9% of annual sales, per the NRF and Happy Returns 2024 report. Apparel sits at the high end of that range, and poor fit or wrong size is consistently the leading reason apparel comes back.
The PDP is where you prevent it. If a shopper can see how a top falls, where a hem lands, and how fabric drapes, they pick the right size the first time. If they cannot, they bracket: order multiple sizes, keep one, return the rest. Every bracketed order is a return you paid to ship twice.
Yet many sites fail at this. Baymard found that 24% of sites do not let users easily understand an item's overall fit, which risks shoppers gauging fit wrong and choosing the wrong size, per Baymard's apparel best practices. When shoppers cannot find the fit they need, some leave to find it elsewhere. Showing fit is both a conversion lever and a return lever.
On-model vs flat lay vs ghost mannequin
On-model imagery is one of three common ways to show apparel. Each does a different job, and a strong PDP usually uses more than one.
Flat lay shows the garment laid flat and shot from above. It is fast and clean and good for showing detail, color, and print. It tells the shopper almost nothing about fit.
Ghost mannequin shows the garment with the invisible-mannequin effect, holding its 3D shape with no body inside. It shows structure and how the piece holds its form. It still does not show how it sits on a real figure. We cover this in the ghost mannequin guide.
On-model shows the garment worn. It is the only one of the three that proves fit, length, and drape on a body. It is also the most expensive to produce the old way, which is why so many catalogs lean on flats and skip it.
| Flat lay | Ghost mannequin | On-model | |
|---|---|---|---|
| Shows detail and color | Yes | Yes | Partly |
| Shows garment structure | No | Yes | Yes |
| Shows fit on a body | No | No | Yes |
| Shows length and drape | No | Partly | Yes |
| Old-way cost | Low | Medium | High |
| Best for | Detail, print | Structure | Fit, the buy decision |
The takeaway: flats and ghost mannequin support the page, on-model closes it. AI makes the expensive one affordable across the whole catalog. For a deeper comparison, see flat lay vs on-model.
How AI on-model imagery actually works
AI on-model imagery turns a product input into a worn shot. The mechanics matter, because they decide whether the output is accurate.
You start with a source that defines the actual product: a 3D garment file, a CAD, a tech pack reference, or clean flat product photos. The better the source, the more accurate the result. A 3D file carries true shape and proportion. A flat photo carries the real fabric, color, and trims.
The tool then generates the garment on a model, posed and lit, from the angles you specify. The job is to keep the product identical while changing only the context, the body, the pose, and the scene.
This is the difference between a product-creation tool and generic AI image generation. Generic generators invent plausible clothing. A product-accurate workflow holds your exact garment fixed and renders it on a model. One sells your real product. The other sells a fantasy that ships as a return. See how this connects to turning 3D fashion assets into renders.
| Input you provide | What it locks in | Why it matters |
|---|---|---|
| 3D garment file | Shape, proportion, drape | Fit reads true |
| Flat product photo | Fabric, color, trims | Texture and color match |
| Tech pack reference | Construction details | Seams, plackets, pockets stay right |
| Colorway specs | Exact colors | No color drift across the catalog |
The angles and shots that show fit
One on-model image is rarely enough. Shoppers want to inspect a garment the way they would in a fitting room, from several sides.
A fit-complete set usually includes:
- Front, full length. The primary shot. Shows overall fit, length, and silhouette.
- Back. Reveals fit through the shoulders and seat, and any back detail.
- Three-quarter or side. Shows drape and how the piece moves around the body.
- Detail or close-up on the body. Collar, cuff, hem, or fabric at scale, worn.
- Movement, where it helps. A walking or seated shot for flowing or structured pieces.
Baymard notes that at least one basic, unstyled shot should show the product clearly so length and fit are not hidden by tucking, rolling, or pinning. Style some shots, but keep one honest.
Showing the same garment on more than one body also helps. Different shoppers project onto different models, so a second model widens who can picture themselves in the piece. Build this into the PDP asset pack so every style gets the full set, not just the hero.
How to make on-model images with AI step by step
Here is a practical workflow for producing accurate on-model imagery for a style.
- Prepare the product source. Gather the 3D file, CAD, or clean flat photos, plus the exact colorway specs. Accuracy starts here.
- Define the shot list. Decide the angles per style: front, back, three-quarter, detail, and any movement shot.
- Choose model and scene direction. Pick body type, pose, and background that suit the product and the brand. Plan for more than one body where it matters.
- Generate the on-model renders. Produce the worn shots while holding the garment fixed, changing only body, pose, and scene.
- QA for product fidelity. Check fit, length, fabric, color, and construction against the source. This is the step that protects you from returns.
- Approve at a gate. A human signs off on each image before it goes near the PDP.
- Export PDP-ready files. Output the images sized and formatted for your store and your feeds.
Notice the order. Accuracy and approval are not the last polish. They are built into the workflow so a wrong image never reaches a shopper.
What AI should not decide about fit
AI can generate the image. It should not decide whether the image is true. That is a human call, and it is the line that keeps on-model imagery honest.
AI should not invent fit. If the garment runs long, the image should show it running long, not shortened to look cleaner. The render reports the product, it does not improve it.
AI should not drift on color or fabric. A color that shifts between the flat and the on-model shot is a return waiting to happen. The human at the approval gate catches it.
AI should not pick the body that misleads. If you only ever show your fitted styles on one body type, shoppers on other bodies cannot judge fit. Range is an editorial choice, made by a person.
The rule: AI does the production, a human owns the truth. Kampana builds this in with product-fidelity QA and an approval gate on every asset, so accuracy is enforced, not hoped for.
Keeping on-model imagery product-accurate
Accuracy is the entire value of on-model imagery. An inaccurate worn shot is worse than no shot, because it sells a fit that does not exist.
Three things protect accuracy.
First, the source. Generate from inputs that define the real product, a 3D file or clean flats with true colorway specs, not from a text prompt that guesses. Garbage in, returns out.
Second, fidelity QA. Compare every render against the source for fit, length, fabric, color, and construction. Seams, plackets, and pockets should match. Color should not drift.
Third, the approval gate. A person signs off before the image ships. This is the difference between a tool that ships marketing fantasies and one that ships your actual product.
Done this way, on-model imagery does what it promises: it tells the shopper the truth about fit, so the right size goes in the cart and stays bought.
Common mistakes and how to fix them
Mistake: only one on-model shot
A single front shot leaves fit half-explained. Shoppers cannot see the back, the drape, or the length in context.
Fix it:
- Build a shot list of front, back, three-quarter, and detail.
- Apply it to every style, not just heroes.
- Add a movement shot for flowing or structured pieces.
Mistake: styling that hides the product
Tucking, rolling, and pinning make a shot look good and bury the information the shopper needs.
Fix it:
- Keep at least one unstyled shot per style.
- Show true length and fit clearly.
- Save the styled shots for mood, not for fit.
Mistake: color and fabric drift
When the on-model color does not match the flat or the real product, returns follow.
Fix it:
- Generate from the real colorway specs.
- QA color and fabric against the source on every render.
- Approve at a gate before publishing.
Mistake: one body type only
Showing every style on a single body shrinks who can picture themselves in it.
Fix it:
- Plan a second body where fit varies.
- Keep poses comparable across bodies.
- Make range an editorial decision, not an afterthought.
What to look for in an AI on-model tool
If you are choosing a tool or workflow, judge it on accuracy and control, not on how pretty the demo looks.
Look for these:
- Product-accurate generation. It should hold your exact garment fixed and render it on a model, not invent clothing from a prompt.
- Real inputs. It should take 3D files, CAD, or clean product photos, plus colorway specs.
- Fidelity QA. It should let you check fit, color, fabric, and construction against the source.
- An approval gate. A human should sign off on every image before it ships.
- Multiple angles and bodies. It should produce a full fit set, not a single shot.
- PDP-ready export. Output sized and formatted for your store and feeds.
Plain AI image generation fails most of these. It is built to invent, not to reproduce. For apparel, where fit is the buy decision, reproduction is the point. Compare your options in our Higgsfield vs Kampana and Canva vs Kampana breakdowns.
How on-model imagery affects returns and conversion
On-model imagery moves two numbers that matter: returns and conversion.
On returns: fit is the leading reason apparel comes back, and the PDP is where fit is communicated. With returns at roughly 16.9% of US retail sales in 2024 per the NRF, and apparel above that, even a small drop in fit-driven returns is real margin. Showing fit clearly, from several angles, on more than one body, helps shoppers buy the right size once.
On conversion: when shoppers cannot see fit, some leave. Baymard found 24% of sites do not let users easily understand fit, and that shoppers who cannot find worn images may go elsewhere. Closing that gap keeps the shopper on your page and moving toward checkout.
There is also a coverage effect. The old way limits on-model shots to hero styles because studio time is expensive. AI lets you give every style the full fit set, so your long tail stops underperforming for lack of imagery. The page does the selling, across the whole catalog, not just the front window.
None of this needs invented conversion claims to be true. Fewer wrong-size orders and fewer shoppers leaving for better imagery both follow directly from showing fit well.
How Kampana makes on-model imagery
Ecommerce should not start after the product is approved. It should start with the product. Kampana makes on-model imagery from one product source, on a node-based canvas, with product-fidelity QA and an approval gate on every image.
What you get
- On-model imagery for every style and colorway, generated from your 3D, CAD, or flat product shots.
- A full fit set per style: front, back, three-quarter, and detail, with movement where it helps.
- The option to show a style on more than one body.
- Matching flats and ghost-mannequin shots from the same source.
- PDP-ready files sized for your store and your marketplace feeds.
The old way vs Kampana
| Old way | With Kampana | |
|---|---|---|
| Coverage | Hero styles only | Every style and colorway |
| Cost driver | Studio, model, per shoot | Credits, reused per style |
| Fit accuracy | Depends on the shoot | Product-fidelity QA against the source |
| Angles | Whatever fit the budget | Full fit set per style |
| Multiple bodies | Rare, costly | Planned into the set |
| Who approves | Manual review | Human approval gate + fidelity QA |
How it works
- Drop one product on the canvas.
- Wire it to the on-model imagery node and set your shot list.
- Approve each product-accurate render at its gate.
- Export PDP-ready files and push them to your store and feeds.
Pricing is credit-based. You draw from one shared credit pool, with no seats and no subscription, and credits never expire. There is a free starter pack to try it. The ecommerce PDP asset pack workflow lists its real credit range. Feed it from your 3D-to-renders workflow, pair it with marketplace feed optimization, and connect the whole thing in the end-to-end collection launch. See credit pricing.
Frequently asked questions
What is on-model imagery?
On-model imagery is product photography that shows a garment worn on a human body, so shoppers can judge length, fit, and drape. Baymard found it is key for apparel, accessories, and cosmetics because it approximates trying the product on, per Baymard.
Is AI on-model imagery accurate enough to sell from?
It is when it is generated from a real product source and checked for fidelity. A 3D file or clean flats plus colorway specs keep fit, fabric, and color true. The risk is generic AI that invents clothing, which is why product-fidelity QA and an approval gate matter.
Does on-model imagery reduce returns?
Fit is the leading reason apparel is returned, and on-model imagery is the main way to show fit on a PDP. With total US returns around 16.9% of sales in 2024 per the NRF and Happy Returns report, clearer fit imagery is a direct way to reduce wrong-size orders.
How many on-model images should a product page have?
Enough to show fit from several sides: front, back, three-quarter, and a detail shot, plus a movement shot where it helps. Keep at least one unstyled shot so styling does not hide length and fit, per Baymard's apparel guidance.
On-model vs flat lay vs ghost mannequin, which should I use?
Use more than one. Flat lay shows detail and print, ghost mannequin shows structure, and on-model is the only one that proves fit on a body. On-model closes the buy decision, the others support it.
Can I make on-model images before I have a sample?
Yes. If you have a 3D file, CAD, or clean flat product photos, you can generate on-model imagery before a physical sample exists, which lets your PDP and sell-in start earlier.
Will AI models misrepresent my product?
They can if you let them. The safeguard is generating from your real product source, running product-fidelity QA against it, and approving each image at a human gate so nothing inaccurate ships.
How much does AI on-model imagery cost with Kampana?
Pricing is credit-based with no seats or subscription, and credits never expire. There is a free starter pack, and the ecommerce PDP asset pack workflow shows its real credit range.
The bottom line
A shopper cannot try your garment on, so your imagery has to do it for them. On-model imagery is the only kind that proves fit, length, and drape on a body, and fit is the thing that decides both the sale and the return.
AI makes the expensive shot affordable across your whole catalog, but only if it stays accurate. Generate from a real product source, check every render for fidelity, and approve each image before it ships. That is the difference between selling your product and selling a fantasy that comes back.
A product page is not a product photo with a paragraph under it. It is a system for answering one question: will this fit me? Answer it well, for every style.
Build a complete PDP pack · Start creating, free
Schema (JSON-LD)
{
  "@context": "https://schema.org",
  "@graph": [
    {
      "@type": "Article",
      "headline": "On-Model Imagery with AI: How to Show Fit (2026)",
      "description": "How to make product-accurate on-model imagery with AI to show fit, reduce returns, and cover every style and colorway.",
      "author": { "@type": "Organization", "name": "Kampana" },
      "publisher": {
        "@type": "Organization",
        "name": "Kampana",
        "logo": { "@type": "ImageObject", "url": "https://kampana.io/logo.png" }
      },
      "datePublished": "2026-06-28",
      "dateModified": "2026-06-28",
      "mainEntityOfPage": "https://kampana.io/blog/on-model-imagery-ai"
    },
    {
      "@type": "BreadcrumbList",
      "itemListElement": [
        { "@type": "ListItem", "position": 1, "name": "Home", "item": "https://kampana.io/" },
        { "@type": "ListItem", "position": 2, "name": "Blog", "item": "https://kampana.io/blog" },
        { "@type": "ListItem", "position": 3, "name": "On-Model Imagery with AI", "item": "https://kampana.io/blog/on-model-imagery-ai" }
      ]
    },
    {
      "@type": "HowTo",
      "name": "How to make on-model images with AI",
      "step": [
        { "@type": "HowToStep", "name": "Prepare the product source", "text": "Gather the 3D file, CAD, or clean flats plus exact colorway specs." },
        { "@type": "HowToStep", "name": "Define the shot list", "text": "Decide the angles per style: front, back, three-quarter, detail, movement." },
        { "@type": "HowToStep", "name": "Choose model and scene direction", "text": "Pick body type, pose, and background, planning for more than one body." },
        { "@type": "HowToStep", "name": "Generate the on-model renders", "text": "Produce worn shots while holding the garment fixed." },
        { "@type": "HowToStep", "name": "QA for product fidelity", "text": "Check fit, length, fabric, color, and construction against the source." },
        { "@type": "HowToStep", "name": "Approve at a gate", "text": "A human signs off on each image before publishing." },
        { "@type": "HowToStep", "name": "Export PDP-ready files", "text": "Output images sized and formatted for the store and feeds." }
      ]
    },
    {
      "@type": "FAQPage",
      "mainEntity": [
        { "@type": "Question", "name": "What is on-model imagery?", "acceptedAnswer": { "@type": "Answer", "text": "Product photography that shows a garment worn on a human body so shoppers can judge length, fit, and drape. Baymard found it is key for apparel, accessories, and cosmetics." } },
        { "@type": "Question", "name": "Is AI on-model imagery accurate enough to sell from?", "acceptedAnswer": { "@type": "Answer", "text": "Yes, when generated from a real product source like a 3D file or clean flats with colorway specs, and checked for fidelity. The risk is generic AI that invents clothing, which is why QA and an approval gate matter." } },
        { "@type": "Question", "name": "Does on-model imagery reduce returns?", "acceptedAnswer": { "@type": "Answer", "text": "Fit is the leading reason apparel is returned, and on-model imagery is the main way to show fit on a PDP. With total US returns around 16.9% of sales in 2024, clearer fit imagery reduces wrong-size orders." } },
        { "@type": "Question", "name": "How many on-model images should a product page have?", "acceptedAnswer": { "@type": "Answer", "text": "Enough to show fit from several sides: front, back, three-quarter, and a detail shot, plus a movement shot where it helps. Keep at least one unstyled shot so styling does not hide fit." } },
        { "@type": "Question", "name": "On-model vs flat lay vs ghost mannequin, which should I use?", "acceptedAnswer": { "@type": "Answer", "text": "Use more than one. Flat lay shows detail, ghost mannequin shows structure, and on-model is the only one that proves fit on a body." } },
        { "@type": "Question", "name": "Can I make on-model images before I have a sample?", "acceptedAnswer": { "@type": "Answer", "text": "Yes. With a 3D file, CAD, or clean flat product photos you can generate on-model imagery before a physical sample exists, so your PDP can start earlier." } },
        { "@type": "Question", "name": "Will AI models misrepresent my product?", "acceptedAnswer": { "@type": "Answer", "text": "They can if unchecked. The safeguard is generating from your real product source, running product-fidelity QA against it, and approving each image at a human gate." } },
        { "@type": "Question", "name": "How much does AI on-model imagery cost with Kampana?", "acceptedAnswer": { "@type": "Answer", "text": "Pricing is credit-based with no seats or subscription, and credits never expire. There is a free starter pack, and the ecommerce PDP asset pack workflow shows its real credit range." } }
      ]
    }
  ]
}
Lovable publishing prompt
Create a new blog post page at /blog/on-model-imagery-ai for Kampana (AI product creation OS for fashion brands).

Layout:
- Use the standard Kampana blog template (same as /blog/how-to-create-fashion-pdp-asset-pack and /blog/ghost-mannequin-photography).
- H1: "On-Model Imagery with AI: How to Show Fit (2026)"
- Byline: "Written by the Kampana team · Updated 2026 · ~13 min read"
- Render the clickable Table of Contents from the markdown, with anchor IDs on every H2/H3.
- Insert the TL;DR box ("If you only read one thing") as a callout component near the top.
- Convert all markdown tables to responsive styled tables.
- Image slots: replace each IMAGE-* placeholder with a generated visual or product screenshot. Hero = PDP with multiple on-model angles of one garment on the Kampana canvas. Inline images per the HTML comments.
- Keep all internal links (workflows, pricing, related blog posts) as real anchor tags.
- Add the JSON-LD schema block to the page head (Article + BreadcrumbList + FAQPage + HowTo).
- Meta: use the metadata block at the top (title tag, meta description, OG, Twitter card, canonical).
- CTA buttons at the end: "Build a complete PDP pack" -> /workflows/ecommerce-pdp-asset-pack ; "Start creating, free" -> /pricing.

Do not publish live. Stage as draft for human review and approval.
Send one product URL. Kampana turns it into a mini campaign pack.